 Choose the Tracks option to work with tracks. You can create track by yourself using SmartComCPS or the OziExplorer
program on your PC. You can also use recorded tracks. If you switch on the "To route begin" or the "To route end" "follow mode",
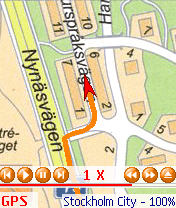
SmartComGPS tells you the length of residuary path, approximate travel time, and warms you about turns and driving in the incorrect direction.
There are two kinds of tracks:
Choose the Tracks option to work with tracks. You can create track by yourself using SmartComCPS or the OziExplorer
program on your PC. You can also use recorded tracks. If you switch on the "To route begin" or the "To route end" "follow mode",
SmartComGPS tells you the length of residuary path, approximate travel time, and warms you about turns and driving in the incorrect direction.
There are two kinds of tracks:
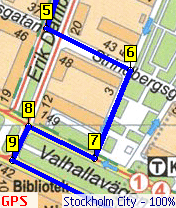
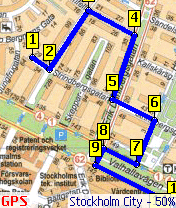
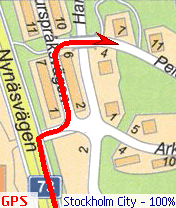
The main or current track – this kind of track shows a traversed path at present.
The traversed path becomes red by default.
Additional tracks – this kind of track shows what you recorded during your previous trips
or what you created by yourself and downloaded to the program. Additional track becomes blue by default.
You can change the color of tracks in the Other menu.
Track files are saved as .plt files and compatible with the OziExplorer program.
-
4.4.1. record on.
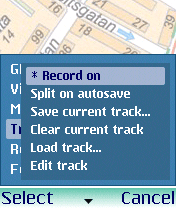 You should switch on the Record on mode to save the GPS module data as a track into a file.
If you want to stop the recording of a track, click the same menu item the second time.
The track is saved in the Tracks folder with the Auto_MMDD_HH name and a .plt file extension.
MM,DD, HH means the month, the day an the hour the file was created .
(For more information go to "Installation"). In the future you can watch and edit the saved tracks
in the SmartComGPS program and also in the OziExplorer program on your PC.
You should switch on the Record on mode to save the GPS module data as a track into a file.
If you want to stop the recording of a track, click the same menu item the second time.
The track is saved in the Tracks folder with the Auto_MMDD_HH name and a .plt file extension.
MM,DD, HH means the month, the day an the hour the file was created .
(For more information go to "Installation"). In the future you can watch and edit the saved tracks
in the SmartComGPS program and also in the OziExplorer program on your PC.
4.4.2. split on save.
Choose the "Split on autosave" option to save each track into a separate file.
Track is saved into a separate file under follow conditions:
- SmartComGPS was restarted
- GPS module was off and then turned on
- The Delete the track settings or Close track options were chosen
If the Split on autosave option is turned off the whole track is being saved into a one file.
4.4.3. save current track.
The "Save current track" option allows you to save the current track into file for using in the future. In the appeared dialog
box you should type a file name of track and specify a folder, which the track will be saved in.
Take a note, if you save some track with its own file name you don’t delete auto saved tracks
(For more information goto "Start recording").
4.4.4. clear current track.
You can take the current track away from the screen. If the Split on autosave option was switched on a new track is saved into a new file.
4.4.5. load track.
You can use the Load track option to load an additional track (automatically saved or prepared before).
In the appeared dialog box select the track saved in the Tracks folder.
You should specify if SmartComGPS loads an additional track by keeping the other ones or takes all the tracks away
except the loaded track. Use the Append to loaded checkbox for it.
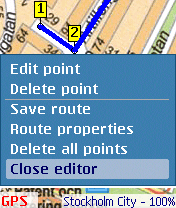
4.4.6. edit track.
You can edit your track. In this mode the tracks and waypoints are displayed even if this mode was turned off before.
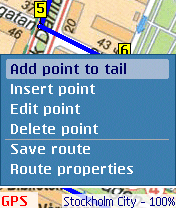
If you want to edit the track you should lead a cursor to a required point and press the Enter/OK button. After that the dialog box is appeared. It contains the follow commands:
Length.
- Add point to tail. The command creates a new waypoint on the track. If you’re just creating your track it will be a first waypoint of the track. If you’re editing the existing track, the created waypoint will be a continuation of the track. It means that the last waypoint will be connected to the created one.
- Insert point. Use this option if you want to insert a waypoint between the two existing ones. After adding a waypoint SmartComGPS automatically draws the track through a new one.
Make note that the Add point to tail option allows you to create a terminal waypoint and the Insert point option lets you insert an intermediate waypoint on the track/route.
- Delete point. The command deletes the indicated waypoint.
- Save track. In the dialog box you can select the track and choose the disk for saving – on either Smartphone memory or removable memory card.
- Delete all points. This option is similar to the Close track option.
If you choose this option without saving all changes will be lost!
- Close editor. Select this option if you want to quit the Editor mode.
4.4.7. track player.
 You can play some created or saved track.
When playing the application shows you the whole track you passed displaying also your speed and all stoppages.
After choosing this option, the track will play automatically: the route cursor starts moving on the screen
and the route is being redrawn. The track is playing five times faster by default.
You can enlarge or reduce a speed of playing tracks.
Depending to selected option on the Layout menu (for more information goto "Layout") you can watch travel rate,
path length, travel time, etc.
You can play some created or saved track.
When playing the application shows you the whole track you passed displaying also your speed and all stoppages.
After choosing this option, the track will play automatically: the route cursor starts moving on the screen
and the route is being redrawn. The track is playing five times faster by default.
You can enlarge or reduce a speed of playing tracks.
Depending to selected option on the Layout menu (for more information goto "Layout") you can watch travel rate,
path length, travel time, etc.
4.4.8. Close track(s).
You can delete from the screen all additional (loaded) tracks.
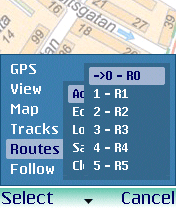 The Routes menu item uses for working with routes. Choose this item to download routes from file,
save routes into file, create a new route or edit the existed one.
The created or downloaded route can be used for navigation by activating the [ Follow ] mode.
The Routes menu item uses for working with routes. Choose this item to download routes from file,
save routes into file, create a new route or edit the existed one.
The created or downloaded route can be used for navigation by activating the [ Follow ] mode.
-
4.5.1. active route.
SmartComGPS allows you to work with many downloaded routes at the same time – up to 100. The active route is a route,
which is being edited or if the Follow mode is switched on at the time. Only the active route is displaying on the screen
by default.
In the Active route option, the submenu opens where you can select the route you want.
4.5.2. edit route.
 Click the Edit route option to edit routes. Before this option is switched on,
you can select the route you want to edit by using the dialog box. To cancel this mode, click this menu item again.
If you want to save changes, click “Save” when you finish editing the route.
Click the Edit route option to edit routes. Before this option is switched on,
you can select the route you want to edit by using the dialog box. To cancel this mode, click this menu item again.
If you want to save changes, click “Save” when you finish editing the route.
4.5.3. load routes.
The Load routes option allows you to load routes from a file. Files must be in OziExplorer format with a .rte file extension.
They are loaded from the "Routes\" folder. Click this menu item and then in the dialog box choose a folder
and a route file you want.
4.5.4. save routes.
The Save routes option allows you to save routes into file. Files are saved into the "Routes\" folder in the OziExplorer format
with a .rte file extension. Click this menu item and then type a file name in the File name box.
If the file already exists, the program will warn you about it and create a backup copy of existed one.
4.5.5. close routes.
The Close route option allows you to close downloaded routes. Be careful when using this option because
the data can be irretrievable lost. If you edit the route before make sure that you saved all changes in the file.
 Use this option if you want to turn on the Follow mode. The program shows you an approximate path length
and travel time and also prompts to you about turnings and what a distance is far from them.
Use this option if you want to turn on the Follow mode. The program shows you an approximate path length
and travel time and also prompts to you about turnings and what a distance is far from them.
-
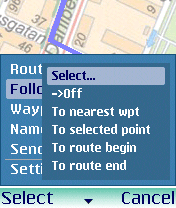
4.6.1. select.
Display a dialog box, which you can choose a point of destination in.
4.6.2. off.
Turn off the Follow mode.
4.6.3. to nearest waypoint.
The program shows the nearest waypoint and prompts to you how to get it.
4.6.4. to selected waypoint.
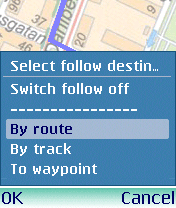 You should indicate the waypoint.
4.6.5. to route begin.
It’s the To route’s start follow mode. You need to select and load the route you want.
When you’re moving, the program tells you a residuary path up to the route’s starting point
and warns about turns and incorrect direction.
4.6.6. to route end.
Follow mode to the route’s final point.
4.6.7. to track begin.
It’s the To track’s start point follow mode.
4.6.8. to track end.
It’s the To the track’s final point follow mode.
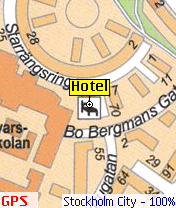
 The Waypoints option allows you to manage waypoints.
Waypoints allow you to pay attention to track traits – required objects, turns, etc.
The Waypoints option allows you to manage waypoints.
Waypoints allow you to pay attention to track traits – required objects, turns, etc.
-
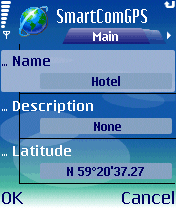
4.7.1. add waypoint.
In this dialog box you can specify Latitude, Longitude and Altitude, range of warnings
and choose a beep for the waypoint you added.
4.7.2. edit waypoints.
The Edit waypoints option allows you to work with a list of current waypoints. You can change the parameters of waypoints (Latitude, Longitude, etc.).
4.7.3. load waypoints.
 The program loads saved waypoints you chose.
This option helps you create waypoints for some region (town, district, country and etc.)
The program loads saved waypoints you chose.
This option helps you create waypoints for some region (town, district, country and etc.)
4.7.4. save waypoints.
The Save waypoints option allows you to save all fixed waypoints. We recommend to create set of waypoints for each region.
It lets you marshal all waypoints and prevent losing them.
4.7.5. reset waypoints.
You can clear all the waypoints on the map. Before use this option, make sure that all needed waypoints are saved to a file,
otherwise all waypoints will be erased.
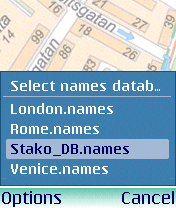
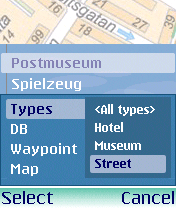
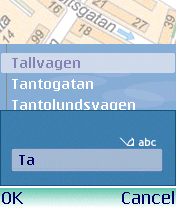
Database of names allows you to search objects on a map.
-
4.8.1. name search.
The Name search option opens the dialog box for search objects. If the database of names wasn’t downloaded yet,
the dialog box opens where you can choose database of names at first.
4.8.2. load database.
Load database of names to memory.
4.8.3. close database.
Unload a hand-picked database of names from memory.
|