4. Menu description
-----------------
Using this option you can operate GPS, program settings, and exchange of information about location
-
4.1.1. Connect.
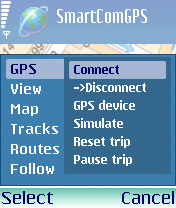 The Connect option switches on the external or internal GPS module.
The GPS color indicator in the lower left corner is yellow while searching and is green after linking startup.
The Connect option switches on the external or internal GPS module.
The GPS color indicator in the lower left corner is yellow while searching and is green after linking startup.
4.1.2. Disconnect.
The Disconnect option switches the GPS receiver to offline mode.
GPS color indicator in the left lower corner is red when turned off.
4.1.3. GPS device.
To select a gps-receiver that will work with the application in the gps navigation mode.
You need to set it once, then just connect/disconnect the GPS mode using the steps described 4.1.2 and 4.1.1 mentioned above.
4.1.4. Simulate.
The Simulate option allows you to work in autonomous mode. In this mode,
you can work only with the data calibration map, not with data which you got from GPS module.
The current location is marked by cursor-dagger. To turn off the Simulate option, select this option again.
4.1.5. Reset trip.
the command erases all trip computing data. (see 4.2.1.6)
4.1.6. Pause trip.
This command stops computing of a trip in progress - speed and trip records will not be saved .
Press again to turn this mode off/on. (see 4.2.1.6)
The View menu allows you to view the information on the screen.
-
4.2.1. Layouts.
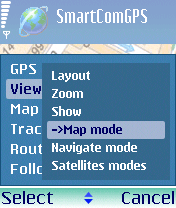 Using this option, you can choose a layout to view additional information. Depending upon your choice,
the following options can be displayed on the screen:
Using this option, you can choose a layout to view additional information. Depending upon your choice,
the following options can be displayed on the screen:
-
4.2.1.1. Extend.
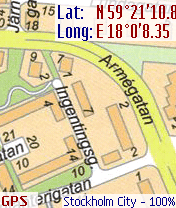
Latitude, Longitude, Azimuth, Altitude, Accuracy, Value Fix (2D, 3D, incorrect),
Universal time, Current speed, Average and Top speed, Path length, Travel time, Nonscheduled down time.
4.2.1.2. Full.
Latitude, Longitude, Current speed, Azimuth, Altitude, Value Fix (2D, 3D, incorrect),
Accuracy, Universal time.
 4.2.1.3. Brief.
Latitude, Longitude, Current speed, Azimuth, Altitude
4.2.1.4. Location.
Latitude, Longitude.
4.2.1.5. Motion.
Current speed, Azimuth, Altitude.
4.2.1.6. Trip.
Current speed, Average and Top speed, Path length, Travel time, Nonscheduled down time.
4.2.1.7. None.
Turn off displaying additional information on the screen.
4.2.2. Zoom.
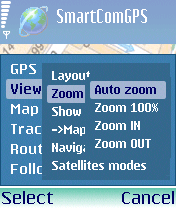 This option allows you to zoom the displayed map
-
4.2.2.1. Auto zoom.
4.2.2.2. Zoom 100%.
Display a one-first scale map
4.2.2.3. Zoom in.
You can enlarge a scale of the map. Displays a map 20 times more than its normal size (2000%)
4.2.2.4. Zoom out.
You can reduce a scale of the map. Displays a map four times less its normal size (25%)
4.2.3. Show.
The Show option allows you to display additional names on the map.
The menu items listed below allow you to turn on displaying the layers.
To cancel this option, click the second time on this menu item.
-
4.2.3.1. Show track.
Turn on/Turn off a displaying of tracks on the map
(downloaded and current map recorded by the program in accordance with GPS data).
4.2.3.2. Show grid.
Turn on/off the map grid. You can set the parameters of map grid in the Settings menu on the Grid tab.
4.2.3.3. Show text.
Turn on/off a displaying of additional information (see Layouts menu)
4.2.3.4. Show compass.
Turn on/off a displaying of compass.
4.2.3.5. Show waypoints.
Turn on/off displaying of waypoints (see Waypoints menu)
4.2.3.6. Show trackpoints.
You can turn on/off a displaying of the track waypoints.
While this option is switched on, on the track waypoints are displayed.
Coordinates of the waypoints were received from GPS module while recording.
4.2.3.7. Show routepoints.
You can turn on/off a displaying of the route waypoints.
4.2.4. Map mode.
Changing the Map menu, a map appears on the screen. It’s the main mode of the working program.
4.2.5. Navigate mode.
Displays on the screen Compass and Current speed, Average and Top speed, Length of track,
Nonscheduled down time and Altitude.
4.2.6. Satellites mode.
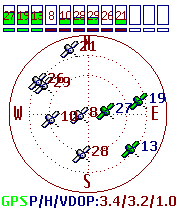 In the main window of the program a map of satellites is displayed.
4.2.7. Text mode.
In the main box there is only text block about Latitude, Longitude, Azimuth, Altitude, Number of satellites,
Value Fix (2D, 3D, incorrect), Universal time, Current speed, Average and Top speed, Path length, Travel time,
Nonscheduled down time.
4.2.8. Full screen.
Turn on/off the full-screen mode.
The Map option allows you to manage maps on the screen
-
4.3.1. Select map.
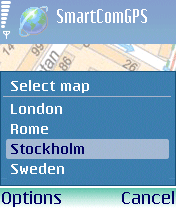 You can select the map you want for displaying it on the screen. In the dialog box you can find maps included in
the Maps folder. (For more information goto Installation)
You can select the map you want for displaying it on the screen. In the dialog box you can find maps included in
the Maps folder. (For more information goto Installation)
4.3.2. Detect map.
The Detect map option lets you find the map you want in the "Maps\" folder.
The map corresponds with your current coordinates and is displayed on the screen
4.3.3. Close map.
Click the Close map option to close a map. Using this option the map will not display
on the screen even if the Map option (View menu) is switched on.
4.3.4. Autoload map.
Switch on this option to download a map automatically if there is this map in the "Maps\" folder.
The map corresponds with your current coordinates. If this option is switched off you should download the map by hand.
For more information goto "Select map".
4.3.5. Auto rotate map
When this mode is selected, a map automaticaly rotates towards your heading.
The cursor will always move to the top of the screen.
4.3.6. Available maps.
Using the option Available maps, you can see a map list. Maps correspond with current coordinates.
4.3.7. Mini-map mode.
The Mini map mode allows you to see the whole map on the screen in small scale.
4.3.8. Index map.
Shows borders for all available maps and their names on a phone’s screen.
This mode useful for a visual map search of a needed region on a blank map.
4.3.9. Where am I?
The program shows your location that corresponds with the coordinate obtained from GPS module.
If the program works in the Play track mode, your location is shown to you on the recorded playing track.
4.3.10. Center map.
To move a point to the centre of the map you should use The Center map option.
4.3.11. Calibrate.
SmartComGPS provides a great opportunity to calibrate maps. With help of SmartComGPS you can calibrate maps
on your phone as well as on your PC. The Calibrate option allows you to easily calibrate the downloaded map.
-
4.3.11.1. Linear shift.
Linear shift is a visual method of calibration. It allows you to move your location,
waypoints and tracks on the map. Scale and slope are invariable at the same time.
After you select this menu item, you can superpose recorded track with the track on the map and
then finish the calibration by pressing the [Enter/Ok] button.
When you finish editing the map, you can save changes to the map file or cancel the information.
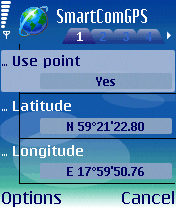
4.3.11.2. Edit points.
The change waypoints option allows you to edit waypoints.
We recommend only advanced users use this option because it is rather difficult.
If you enter data incorrectly using this option, it can result in unpredictable consequences.
When you finish editing the map, you can save changes to the map file or cancel the information.
4.3.11.3. Edit borders.
The Edit border option lets you edit map limits. Press the [Enter/Ok] button to edit map boards in the contextual menu.
To cancel this option click this menu item again.
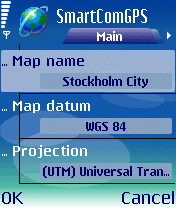
4.3.11.4. Settings.
Click the Settings option to enter map characters in the dialog box.
Here, you can type a map name, additional characters of projection (for example, a central meridian)
and choose projection and datum.
|